Deploying ResNet Models with Java and DJL (Deep Java Library)
In the Java world, deep learning often sounds like something you must do with Python. In reality, DJL (Deep Java Library) allows you to run deep learning models such as ResNet and BERT directly in a pure Java environment(no extra Python service required). This reduces deployment costs and eliminates network latency.
1. Why Use DJL for Deep Learning in Java?
Compared to cross-language calls (gRPC/HTTP API), DJL offers:
- No extra service: Run models directly in the Java process
- Low latency: No network transfer overhead
- Easy deployment: Package as a single Jar file
The downside is that models need to be converted to formats like .pt or .onnx that DJL can read.
2. Environment Setup for Java + DJL
Let’s start from environment setup.
- Install JDK 17+
- Create a Maven project (or Gradle)
- Add dependencies (Maven example above)
<properties>
    <djl.version>0.26.0</djl.version>
</properties>

<dependencies>
    <!-- DJL Core API -->
    <dependency>
        <groupId>ai.djl</groupId>
        <artifactId>api</artifactId>
    </dependency>

    <!-- PyTorch Engine -->
    <dependency>
        <groupId>ai.djl.pytorch</groupId>
        <artifactId>pytorch-engine</artifactId>
    </dependency>

    <dependency>
        <groupId>ai.djl</groupId>
        <artifactId>model-zoo</artifactId>
    </dependency>

    <dependency>
        <groupId>org.slf4j</groupId>
        <artifactId>slf4j-simple</artifactId>
        <version>1.7.36</version>
    </dependency>
</dependencies>
3. Loading and Deploying a ResNet Model in Java
The code below shows how to load a local ResNet-18 model (TorchScript format) with DJL and classify an image.
// The translator defines preprocessing steps for input images, postprocessing steps for model outputs,
// and optional settings such as applying softmax and loading class labels (synset).
Translator<Image, Classifications> translator =
    ai.djl.modality.cv.translator.ImageClassificationTranslator.builder()
    // Resize the shorter side of the image to 256 pixels while keeping aspect ratio
    .addTransform(new Resize(256))
    // Crop the center 224x224 pixels (standard ImageNet input size)
    .addTransform(new CenterCrop(224, 224))
    // Convert image to tensor format for model consumption
    .addTransform(new ToTensor())
    // Normalize pixel values using ImageNet's mean and standard deviation
    .addTransform(new Normalize(
        new float[] {0.485f, 0.456f, 0.406f},   // mean (R, G, B)
        new float[] {0.229f, 0.224f, 0.225f})) // std deviation (R, G, B)
    // Apply softmax to convert raw logits into probability values
    .optApplySoftmax(true)
    // Provide the path to the class labels file (synset)
    // Here we load it from the project's resources folder
    // Download from https://raw.githubusercontent.com/pytorch/hub/master/imagenet_classes.txt
    .optSynsetUrl(Paths.get("/path/to/your/synset.txt").toUri().toString())
    .build();

// This should point to where the TorchScript model file (traced_resnet18.pt) is stored.
// Download from https://resources.djl.ai/test-models/traced_resnet18.pt
Path modelDir = Paths.get("/path/to/your/resnet18");

// Criteria describes the requirements for the model to be loaded from the Model Zoo or local path.
Criteria<Image, Classifications> criteria = Criteria.builder()
    .optEngine("PyTorch")                                 // Force the PyTorch engine
    .optApplication(Application.CV.IMAGE_CLASSIFICATION)  // Specify application domain
    .setTypes(Image.class, Classifications.class)         // Input type: Image, Output type: Classifications
    .optModelPath(modelDir)                               // Path to the model directory
    .optModelName("traced_resnet18")                      // Model file name (without .pt extension)
    .optTranslator(translator)                            // Attach the translator for preprocessing/postprocessing
    .optProgress(new ProgressBar())                       // Show progress bar during model loading
    .build();
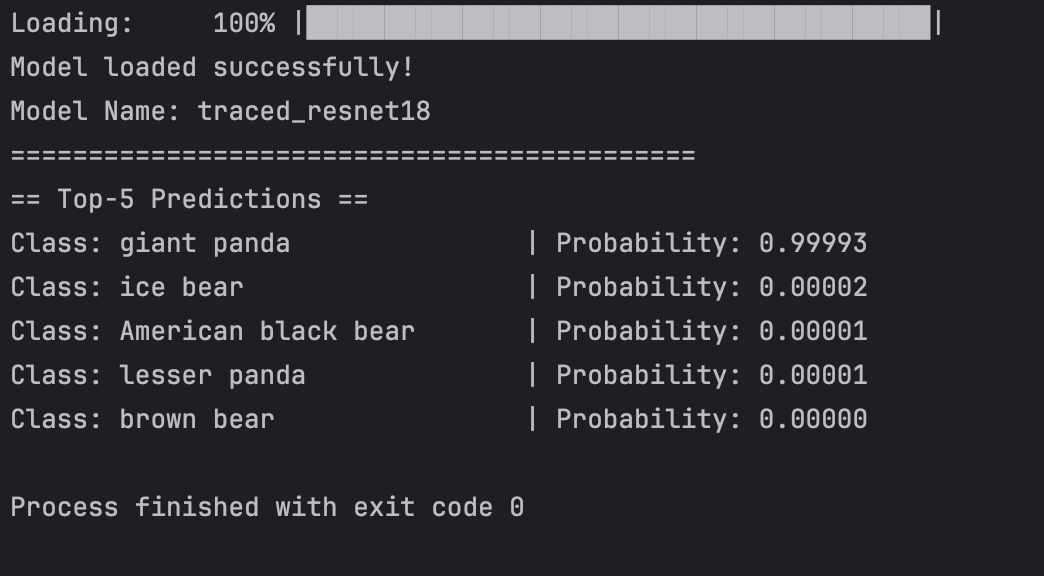
4. Running Inference and Printing Output
Once the model and Predictor are ready, you can run inference on an image and print the top-5 predictions.
try (ZooModel<Image, Classifications> model = ModelZoo.loadModel(criteria);
     Predictor<Image, Classifications> predictor = model.newPredictor()) {
    // Attempt to load a local image
    Image img = ImageFactory.getInstance().fromFile(Paths.get("/path/to/your/image.png"));
    // Pass the image to the predictor and receive the classification results.
    Classifications result = predictor.predict(img);
    // Display the top 5 predictions with their probabilities.
    result.topK(5).forEach(c ->
        System.out.printf("Class: %-25s | Probability: %.5f%n",
            c.getClassName(), c.getProbability())
    );
}
Result Examples:
5. Workflow and Summary
Java Application -> ImageFactory loads the image -> Translator applies preprocessing -> DJL (PyTorch engine) runs inference -> Translator applies postprocessing -> Output classification results
With DJL, we can efficiently run deep learning models in Java without relying on Python services, making it ideal for low-latency, Java-based environments. However, if models change frequently or require support for multiple programming languages, gRPC or HTTP may be a better choice.